Kitchen Exhaust Fans Are Not Easy to Clean; Here’s How to Do it Easily
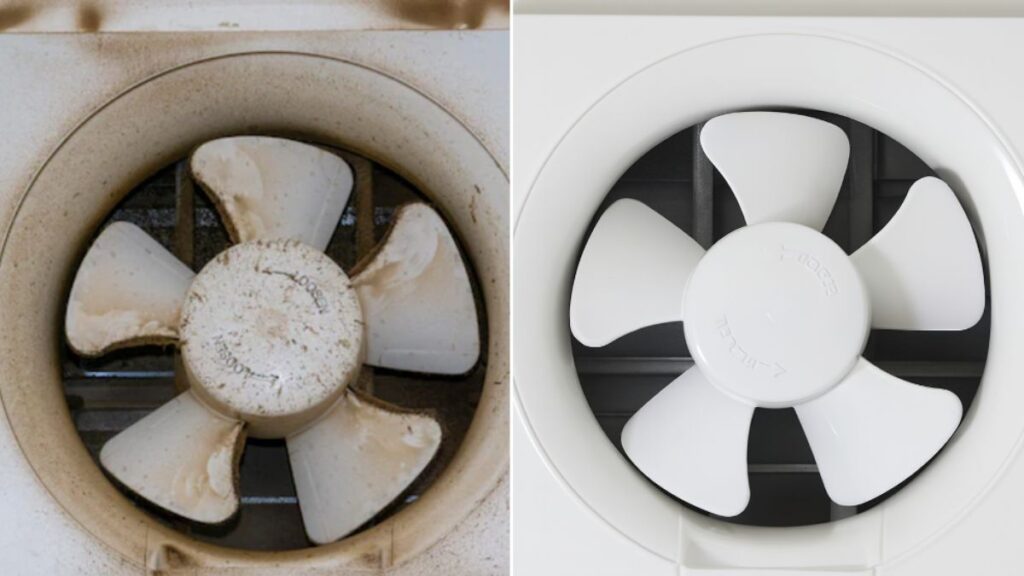

Cooking every day makes your kitchen warm, aromatic, and inviting, but it also leaves behind an unwelcome guest: grease. The kitchen exhaust fan, which works hard to pull out smoke, fumes, and oil particles, becomes the biggest victim. Its blades, outer cover, and grease pan quickly turn sticky and black, making the fan look dirty and work less effectively. If left uncleaned, the fan slows down, and odors start lingering in your kitchen. The good news is that you don’t need costly cleaners. With a few household ingredients, you can make your exhaust fan shine again.

What Causes Kitchen Exhaust Fans to Get Greasy?
Whenever you fry, sauté, or prepare tadka, tiny oil droplets and steam rise into the air. The exhaust fan pulls these in, but instead of fully releasing them outside, a lot of the grease sticks to the blades, cover, and grease pan. Over time, dust mixes with the grease, creating a thick layer that is hard to remove. If you don’t clean it regularly, this layer hardens, slows down the fan, and spreads dirty air in the kitchen.
Things You Will Need
- Baking soda
- White vinegar
- Dish soap
- Lemon
- Scrubber, sponge, or microfiber cloth
- Toothbrush or paintbrush (for corners)
- A bucket or sink filled with hot water
Steps to Clean Your Kitchen Exhaust Fan
- Turn off the power: Always switch off the power supply before cleaning.
- Detach the parts: Remove the outer cover and grease pan carefully. If the fan blades are accessible, prepare to clean them as well.
- Soak the parts: Fill a bucket or sink with hot water. Add dish soap, a spoonful of baking soda, and a splash of vinegar. Place the cover and grease pan in this solution and let them soak for 20–30 minutes.
- Clean the blades: While the parts are soaking, wipe the blades with a damp cloth. For tougher grease, make a paste of baking soda and water, apply it, and scrub gently.
- Scrub and rinse: After soaking, scrub the cover and grease pan with a sponge or soft brush. Rinse well with warm water.
- Reach tricky corners: Use an old toothbrush or paintbrush to clean edges and corners where grease collects.
- Dry and reassemble: Let all the parts dry completely before putting them back together and turning on the power.
Pro Tip for Stubborn Grease
If the grease is still not coming off, try using laundry detergent powder. Mix a strong solution in warm water and soak the greasy parts in it. This works well for sticky build-up that refuses to budge.
Precautions to Keep in Mind
- Never attempt cleaning while the fan is plugged in.
- Avoid harsh scrubbers that can scratch the metal surface.
- Make sure everything is completely dry before reassembly to protect the motor.
- Clean the fan every 3–4 weeks if you cook daily, or every two months if you cook less often.
- Wiping the blades with lemon juice after cooking helps reduce odors and slows grease build-up.
Regular cleaning keeps your exhaust fan running smoothly, makes your kitchen fresher, and saves you from the pain of dealing with hardened grease later. With these simple steps, you can keep your exhaust fan looking new without much hassle.